Devinci Stone Material
While most would agree that limestone is a visually pleasing building material, it does have a few downsides, including its heavy weight and delicate nature. Here at DeVinci Cast Stone, we have worked for years to develop the precise formula to give you a beautiful, durable, and non-combustible mantel. Using Glass Fiber Reinforced Concrete (GFRC) along with special aggregate and techniques, we have created a product that is as durable and elegant as carved natural stone without the excessive weight. This lighter product significantly reduces shipping costs and allows installation without the use of special lifting equipment.
GFRC is fire resistant, therefore, you can depend on a DeVinci Cast Stone mantelpiece to keep your family safe. Our surrounds are also extremely durable. A mantle constructed of this material is able to withstand the heat of even a very large fire, and is also suitable for outdoor use. Your mantelpiece will not rot, swell, or wear away when exposed to moisture, and the unique properties of this material also allow our mantles to resist cracking.
When you choose a DeVinci fireplace surround, you can get the look and strength of authentic limestone at a price that is typically much lower than the real thing – See Finishes
Our manufacturing process places a traditional face mix of high strength concrete into our forms, to achieve a hard durable surface finish, backed with fiber reinforced lightweight fill. The result is a product that has crisp hard edges, resists staining from excessive water absorption, can be completely solid, and weighs far less than a normal concrete product. This ensures our finished mantels are exactly what our customers were promised, offering the best of both worlds.
Framing Instructions
The first thing to consider when planning for a cast stone mantel is the framing around the firebox. These mantels are GFRC (Glass Fiber Reinforced Concrete) and must be firmly attached to the structure of the home. We provide general instructions and connection hardware with your shipment, but you will need to make certain that the structure is there to attach your mantel.
*There is also a more specific layout that you can view by clicking the “sketches” button for your chosen mantel, located just below the fireplace surround description, in the grey section of the page.
Patching, Cleaning, & Caulking
In the event you find a spot on your fireplace that needs a little patching, you will find the process quick and easy.
Your shipment will include a premixed patching liquid, to be used with your grout material, only for patching. Simply mix just enough in a cup to fill the patch area to the consistency of cookie dough. Dampen the area to be patched and apply the dough, keeping the fill inside the patch area. You may use a very small trowel tip or something similar to apply and smooth. Matching the existing fireplace texture/look is left up to the eye of the person patching. If the patch is troweled smooth, it may have a slight change in texture, compared to the surrounding stone. Clean the area lightly with a damp sponge and let it dry naturally. Using an acid wash on a cotton swab, after material has dried, may help etch the patch. It may take a few days for the patch to reach its final color, so give it time as the grout mix is the same mix used during the pour of your fireplace.
Regardless of the degree of care exercised during construction, a final wash-down will be needed and normally whatever is specified to clean brickwork will adequately clean Cast Stone. The most common stains, due to construction, are dirt and mortar. Dirt can be removed by scrubbing with a mild detergent and water. Mortar stains and residue will require use of masonry cleaner. We recommend “Lime Solvent 101” by ProSoCo Products, mixed 6 parts water to 1 part Lime Solvent solution.
Using a soft bristle brush, water and this diluted masonry cleaner will allow the stone’s surface to be cleaned without being etched. Smaller brushes, such as a toothbrush, may be required to clean inside corners or detailed areas of the surround.
Take necessary steps to protect surrounding areas that may come in contact with the cleaner. Soak the stone with water prior to washing, with any acidic cleaning solution to prevent surface burning. Ensure that lower stones are frequently drenched with water, because as solution is rinsing down the stone it can gather strength when reapplied.
Allowing the cleaner to dry on the surface may result in stains and residue. Using fresh water, thoroughly rinse the stone’s surface to remove any chemical residue or free sand immediately after cleaning and before it is allowed to dry. Do not allow the cleaner to remain on the grout joints any longer than is absolutely necessary, as they are much more vulnerable to discoloration and deterioration when exposed to acid solutions.
If the surround has stubborn stains that are not affected by recommended solution, contact our office for assistance. When unusual stains appear, the same procedures, which are recommended to clean concrete, will normally clean Cast Stone. The most important step to stain removal is identifying the stain and its cause. There are de-greasers and paint removers readily available. Any treatment should be tested on a small inconspicuous area prior to cleaning the main unit.
Allowing the cleaner to dry on the surface may result in stains and residue. Using fresh water, thoroughly rinse the stone’s surface to remove any chemical residue or free sand immediately after cleaning and before it is allowed to dry. Do not allow the cleaner to remain on the grout joints any longer than is absolutely necessary, as they are much more vulnerable to discoloration and deterioration when exposed to acid solutions.
Patching
Caulking
Installation Information
How to Install Your Fast Favorite DeVinci Cast Stone Mantel
Our Fast Favorite mantels have been designed with ease of installation in mind. From contractors to experienced weekend warriors, installation should be a breeze with our detailed instruction guide, setting drawings, and special mounting hardware.
Use the cutting worksheets below for instructions on cutting oversized fillers.
**Local building codes should always be consulted before beginning any construction project.**
How to Install Your Custom DeVinci Cast Stone Mantel
To make installation easier for our clients, we have created detailed instruction manuals and video resources. We provide clips, shims and pointing mortar for every mantel, as well as setting plans for your specific mantel.
*For best results, you should seek knowledgeable installers in order to achieve a quality installation. Local building codes should be followed.
Hearth Installation Preparation Video
Since having a level foundation is one of the most important parts of installation, we factor in a 1/4″ space beneath all hearths in every one of our designs. This space allows for placement of varying heights of 1/16″ spacers to help bring the hearth to level. Even if your floor is perfectly level, a 1/4″ grout joint is still used, with a full 1/4″ spacer height along the length of the hearth. Hearths should be laid first with the middle hearth stone having its center aligned to the firebox centerline scribed on the wall. After the center stone is placed, the left and right side hearth stones will be placed 1/4″ from the center stones edges. This video provides further details on our standard hearths and our recommended installation methods.
Hearth Installation Options
As in any construction project, the installation of your DeVinci Fireplace Surround must start off on a good foundation. The base of the surround is the hearth. Since flooring methods vary from dwelling to dwelling, our representatives work with customers to identify the appropriate installation method for the hearth. These installation options include but are not limited to, the following.
Prior to Finished Floor Installation:
If your flooring isn’t installed prior to mantel installation, you can use a wooden base to raise the hearth, leaving space beneath the hearth’s edges to tuck your flooring under as it is placed.
On Top of Finished Floor:
Our hearths can also be installed on top of finished flooring such as wood, vinyl, or tile. A ¼” joint space beneath allows for adjustment in case the floor line being installed on is unlevel.
Flush with Finished Floor:
For certain flooring types that are thicker than 1”, there is the option to have the top of the hearth flush with the finished flooring. This is achieved by placing our hearth directly onto the subfloor or foundation of your home & bringing the finished flooring up to its edges, creating a seamless transition.
Partially Above Finished Floor:
This method is used when our hearth is placed on the subfloor & the surrounding flooring is thinner than the hearth. This results in the top of the hearth protruding a bit higher than the surrounding flooring.
Raised Hearths:
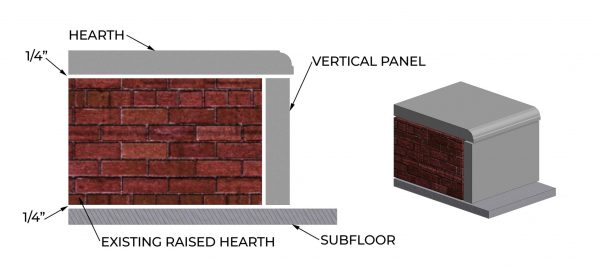
There are two options for our raised hearth, and which one is used will depend on whether or not you have an existing raised hearth. For homeowners that already have a raised hearth but want to modernize it & match it to their cast stone mantel, see Option 1. With Option 1, panels that match your surround are provided to clad the visible faces of your hearth.
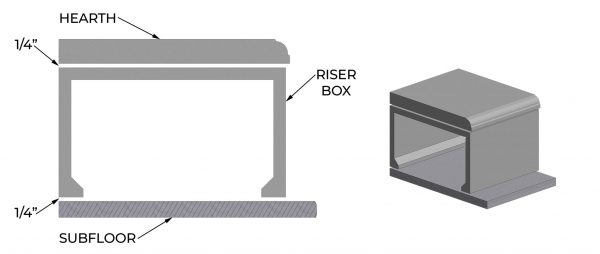
For homeowners that do not have a raised hearth but would like to add one, see Option 2. With Option 2, full 3D raiser boxes are provided for our hearth stones to sit on top of. These boxes are just as durable as a brick or wooden base.
Raised Hearth Option 1:
Raised Hearth Option 2: